
Spring Boot Testing.
As a follower of TDD I prefer to write test firstly and then implement logic for passing it. In this post I am going to demonstrate how to do “Unit Testing” in Spring Boot project.
Overview
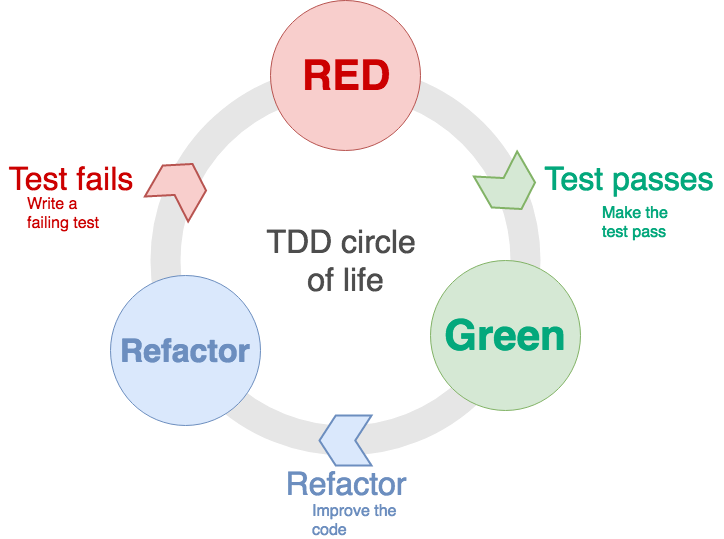
Most Agile developers work in this circle of life when adding new code. Write the test first. Make it pass. Then refactor. I’ve been using TDD technique for a few years
Fundamentals of TDD
Test-driven development (TDD) is a software development process that relies on the repetition of a very short development cycle. It can be succinctly described by the following set of rules:
- Add a test
- Run all tests and see if the new one fails
- Write some code
- Run tests
- Refactor code
- Repeat
Fundamentals of JUnit
JUnit is a simple unit testing framework for the Java programming language. It is an implementation of the xUnit architecture for unit testing frameworks.
Setup
As an example application I am going to use project from my previous post - spring-todo-app
Dependencies
Project has next list of dependencies:
- spring-boot-starter-data-jpa
- spring-boot-starter-web
- h2 DB
- spring-boot-starter-test
Maven
see pom.xml
1
2
3
4
5
6
7
8
9
10
11
12
13
14
15
16
17
18
19
20
21
<dependencies>
    <dependency>
        <groupId>org.springframework.boot</groupId>
        <artifactId>spring-boot-starter-data-jpa</artifactId>
    </dependency>
    <dependency>
        <groupId>org.springframework.boot</groupId>
        <artifactId>spring-boot-starter-web</artifactId>
    </dependency>
    <!-- JDBC driver for H2 DB -->
    <dependency>
        <groupId>com.h2database</groupId>
        <artifactId>h2</artifactId>
    </dependency>

    <dependency>
        <groupId>org.springframework.boot</groupId>
        <artifactId>spring-boot-starter-test</artifactId>
        <scope>test</scope>
    </dependency>
</dependencies>
Gradle
see build.gradle
1
2
3
4
5
6
dependencies {
	compile('org.springframework.boot:spring-boot-starter-data-jpa')
	compile('org.springframework.boot:spring-boot-starter-web')
	runtime('com.h2database:h2')
	testCompile('org.springframework.boot:spring-boot-starter-test')
}
Mocking
Sometimes when you do not need (or don’t want) to use real instance of object you can use Mock Object instead. There are several reasons why you need to use Mock Objects eg:
- You don’t what to call real logic.
- You need to simulate remote calls (REST services, DB etc)
- You need to simulate behavior of library class or system (I call it “black box”)
For mocking object in my tests I use Mockito framework. I found this framework very useful for unit testing. Let’s see an example of unit test class:
1
2
3
4
5
6
7
8
9
10
11
12
13
14
15
16
17
18
19
20
21
22
23
24
25
26
27
28
29
30
31
@RunWith(MockitoJUnitRunner.class) // 1
public class TodoServiceTest {
    @InjectMocks // 2
    private TodoService service;

    @Mock // 3
    private TodoListRepository todoListRepository;

    @Mock
    private TaskRepository taskRepository;

    @Test
    public void saveTaskShouldSaveInDBTest() {
        final Task task = new Task();

        when(taskRepository.save(task)).then(invocation -> { // 4
            task.setId(1l);
            return task;
        });

        Task actual = service.saveTask(task);

        verify(taskRepository, times(1)).save(task); // 5
        assertNotNull(actual.getId());
        assertNotNull(actual.getCreatedAt());
        assertNotNull(actual.getCreatedBy());
        assertNotNull(actual.getUpdatedAt());
        assertNotNull(actual.getUpdatedBy());
        assertFalse(actual.getComplete());
    }
}
You can find full code here
Now let’s explain source code by lines:
@RunWith(MockitoJUnitRunner.class)- Annotation which says to JUnit use MockitoJUnitRunner runner instead standard one. MockitoJUnitRunner initializes mocks annotated with@Mock.@InjectMocks- by using this annotation Mockito will try to inject mocks only either by constructor injection, setter injection, or property injection in order and as described below.@Mock- Mark a field as a mock.- An example of using mocked field. Use it when you want the mock to return particular value when particular method is called.
- Verifies certain call happened at least once
Integration Testing
The main purpose of Integration Testing performed to expose defects in the interfaces and in the interactions between integrated components or systems. I our case we run all modules (Repository and Service) together. Actually we start “embedded” Spring Boot application.
Here is an example of Integration Test:
1
2
3
4
5
6
7
8
9
10
11
12
13
14
15
16
17
18
@RunWith(SpringRunner.class) \\ 1
@SpringBootTest(webEnvironment = SpringBootTest.WebEnvironment.RANDOM_PORT) \\ 2
public class TodoServiceIntegTest {

    @Autowired \\ 3
    private TodoService service;

    ...

    @Test
    public void saveItemShouldCreateNewItemInDBTest() {
        Task task = new Task("task #1", "simple task #1", false);
        Task actual = service.saveTask(task); // 4
        assertNotNull(actual);
        assertNotNull(actual.getId());
    }
    ...
}
You can find full code here
@RunWith(SpringRunner.class)- Annotation which says to JUnit use SpringRunner (SpringJUnit4ClassRunner) which provides functionality of the Spring TestContext Framework to standard JUnit tests by means of the TestContextManager and associated support classes and annotations. It allows us to use@Autowiredannotation withing test.@SpringBootTest(...)- Does initialization of Application Context_ and we can use SpringBootContextLoader@Autowired- Injects instance of testable component.- We do call of real logic.
When we run Integration Test we actually start Spring Boot server and do testing against real application.
@WebMvcTest
WebMvcTest is good choose if you don’t want to run whole Spring Boot server, like in case of Integration Test. It is only going to scan the controller you’ve defined and the MVC infrastructure.
Here is simple example of usage WebMvcTest:
1
2
3
4
5
6
7
8
9
10
11
12
13
14
15
16
17
18
19
20
21
22
@RunWith(SpringRunner.class)
@WebMvcTest(TodoController.class) \\ 1
public class TodoControllerTest {
    @Autowired
    private MockMvc mockMvc;

    @MockBean \\ 2
    private TodoService todoService;

    @Test
    public void souldReturnOneTaskById() throws Exception {
        String expectedJson = "{\"createdAt\":null,\"updatedAt\":null,\"createdBy\":null,\"updatedBy\":null,\"id\":null,\"title\":\"Simple task\",\"description\":\"Just simple task\",\"todoList\":null,\"complete\":false}";

        when(todoService.findTask(1L)).thenReturn(new Task("Simple task", "Just simple task", false));

        mockMvc                                                \\ 3
                .perform(get("/api/tasks/1"))
                .andDo(print())
                .andExpect(status().isOk())
                .andExpect(content().json(expectedJson));
    }
}
You can find full code here.
- By
@WebMvcTest(TodoController.class)we define that we are going to test TodoController. @MockBeanuse mocked version of Service- Perform GET call to
/api/tasks/1endpoint, expecting OK(HTTP 200) as a result code and as a response JSON content which should equals toexpectedJson
Conclusion
As you can see there are several ways how to test your Spring Boot application. In my practice I use all of them just to be on safe side. You probably may want split Integration Tests and run it separately as different maven/gradle profile, haw to do it I will show in my next post.
Please leave you comments and ask questions!
You can find source code of project here